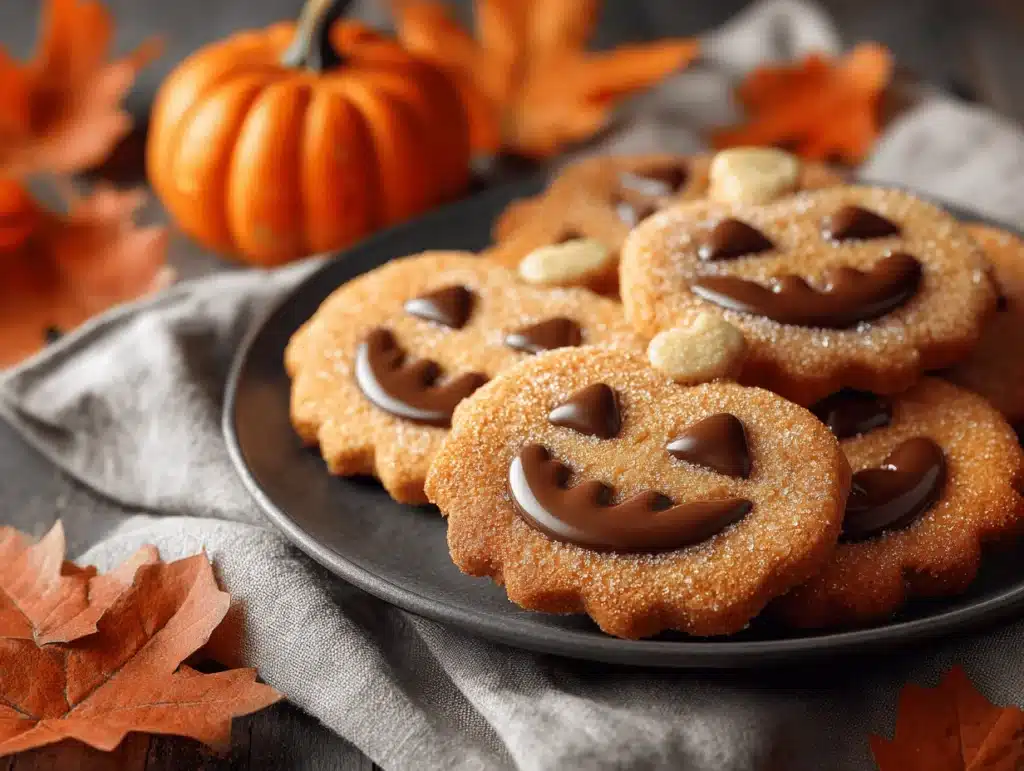
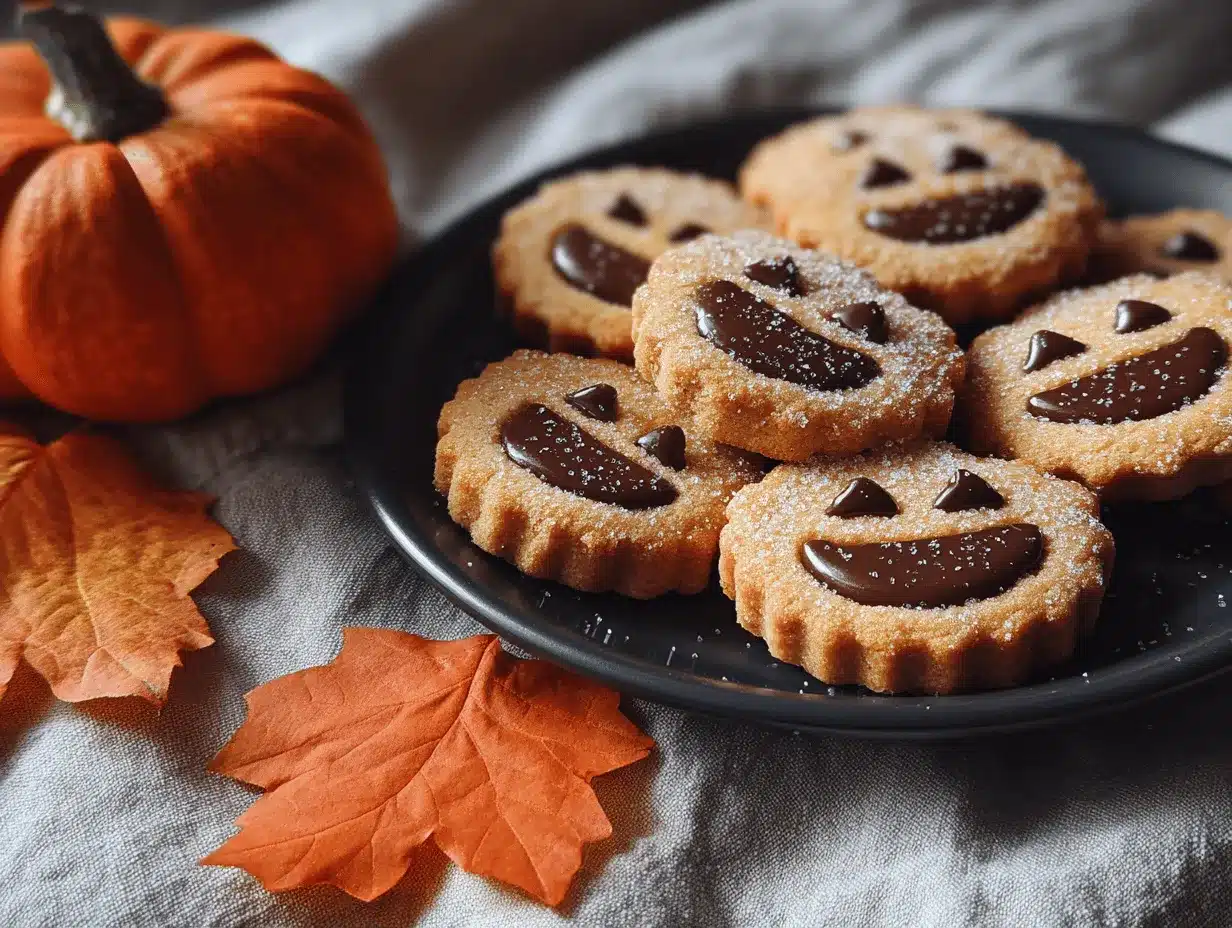
The very first time I baked a batch of these milk chocolate stuffed Jack O Lantern cookies, it was a chilly October evening and the kitchen smelled like toasted sugar mixed with a hint of creamy chocolate. You know the kind of cozy scent that makes you want to snuggle up in a blanket and sneak a cookie straight off the tray? That’s the vibe these cookies bring! I’ve always been a sucker for Halloween treats, but honestly, the store-bought stuff never quite hits the spot for me. There’s something magical about crafting your own festive goodies, especially when they look as cute as these Jack O Lantern cookies and taste like pure chocolatey bliss.
I stumbled upon the concept for these milk chocolate stuffed Jack O Lantern cookies while brainstorming ways to make Halloween desserts both fun and irresistible for my kids (and, let’s be real, my inner child). Sure, you can go wild with complicated cakes and candy, but there’s nothing better than a soft sugar cookie that’s hiding a melty milk chocolate center—especially when you get to decorate each cookie with silly or spooky pumpkin faces. These cookies aren’t just adorable for parties or trick-or-treating, they’re also a hands-on baking project that brings everyone together. If you’ve ever struggled to find a homemade Halloween recipe that’s easy, crowd-pleasing, and actually tastes good, trust me—this one’s for you.
Over the years, I’ve tested these cookies with different doughs, chocolates, and decorating techniques. And every time, they disappear from the table in minutes. Whether you’re making them for a Halloween bash, school treat, or just a cozy night in, these milk chocolate stuffed Jack O Lantern cookies check all the boxes: festive, fun, and downright delicious. If you love the blend of sweet sugar cookie and rich milk chocolate, plus a little holiday magic, you’re going to want this recipe in your fall baking rotation.
Why You’ll Love This Recipe
- Super Festive: These Jack O Lantern cookies are the definition of Halloween spirit—bold, bright, and perfect for decorating with kids or friends.
- Easy to Make: No fancy skills required. You’ll be rolling, cutting, and stuffing—just basic baking steps with big visual payoff.
- Milk Chocolate Surprise: Each cookie hides a gooey milk chocolate center, so every bite is an unexpected treat.
- Customizable Faces: Go wild with expressions—silly, spooky, or classic pumpkin grins. It’s a great excuse to get creative!
- Soft, Buttery Texture: The sugar cookie base stays tender and slightly chewy, even after a few days (if they last that long).
- Crowd-Pleaser: Every time I bring these to a Halloween party, they disappear faster than you can say “trick-or-treat.”
The real magic in these milk chocolate stuffed Jack O Lantern cookies comes from the balance of flavors and textures. You get the classic buttery cookie, but with that surprise burst of creamy chocolate inside—it’s like a little Halloween gift in every bite. I’ve baked these with my family, at bake sales, and for neighborhood gatherings, and they always get rave reviews. What sets this recipe apart is the way the chocolate stays soft inside the cookie (thanks to a simple chilling trick), so you never get that dry, crumbly feel—just smooth, melt-in-your-mouth goodness.
Honestly, if you’re looking for the kind of Halloween treat that’s easy enough for beginners but impressive enough for Pinterest, this is it. Decorating the faces is half the fun, and you can make each cookie look unique (no two Jack O Lanterns are exactly the same, right?). And if you want a recipe that feels like a tradition in the making, this one is absolutely it. I’ve tried other stuffed cookies, but nothing beats the combo of festive looks and chocolatey centers you get here. Trust me, they’re the kind of treat that makes you smile before you even take the first bite!
Ingredients Needed
These milk chocolate stuffed Jack O Lantern cookies use simple, familiar ingredients to create a festive treat with bold flavor and eye-catching style. Most of what you need is probably in your pantry already, and you can swap a few things based on dietary needs or what you have on hand.
- For the Cookie Dough:
- 2 1/2 cups (315g) all-purpose flour (plus extra for rolling)
- 1/2 tsp baking powder
- 1/4 tsp salt
- 3/4 cup (170g) unsalted butter, softened (room temp is key!)
- 1 cup (200g) granulated sugar
- 1 large egg, room temperature
- 1 1/2 tsp pure vanilla extract
- Orange gel food coloring (for the signature pumpkin look)
- For the Filling:
- 5 oz (140g) milk chocolate bars or chocolate chips (I use Ghirardelli or Hershey’s for the creamiest results)
- For Decorating:
- Black writing gel or melted chocolate (for drawing faces)
- Green writing gel or green icing (for pumpkin stems)
- Optional: colored sprinkles or sanding sugar (for extra sparkle)
Ingredient Tips & Substitutions:
- If you need gluten-free cookies, swap the all-purpose flour for a 1:1 gluten-free blend (I like King Arthur’s).
- No milk chocolate? You can use semi-sweet or dark chocolate for a richer filling.
- Butter substitute: Use vegan butter sticks if you want a dairy-free cookie, but keep in mind the flavor will change a bit.
- Egg-free option: Use a flax egg (1 tbsp ground flaxseed + 2.5 tbsp water, mixed and rested 5 minutes).
- If you don’t have gel food coloring, liquid works too, but you’ll need a bit more for vibrant orange.
Seasonal tweaks: Sometimes I add a pinch of cinnamon or pumpkin pie spice to the dough for an extra autumn vibe. And if you’re feeling adventurous, swap out the milk chocolate for caramel squares or peanut butter cups—so good!
Equipment Needed
- Mixing Bowls: One large, one medium—any sturdy set will do.
- Electric Mixer: Hand or stand mixer (a whisk works in a pinch, but your arms might get tired!).
- Rolling Pin: For getting that dough nice and even. If you don’t have one, a clean wine bottle works!
- Pumpkin-Shaped Cookie Cutter: About 3 inches wide—look for one with a little stem for the full Jack O Lantern effect.
- Baking Sheets: Line with parchment paper for easy cleanup.
- Spatula: To transfer cookies without breaking them.
- Small Paring Knife or Toothpick: For cutting out faces (if you don’t have a cutter with face details).
- Cooling Rack: Helps cookies cool evenly and stay soft.
- Piping Bags or Zip-Top Bags: For decorating with writing gels or melted chocolate.
I’ve used everything from dollar-store cutters to fancy copper ones—honestly, they all work as long as you flour the edges. For cleaning up tricky piping tips, soak them in warm soapy water right after use. And don’t stress if you’re missing a cookie rack; just let cookies cool on the parchment-lined tray, moving them around gently with a spatula. Budget hack: parchment paper is a must for easy release and cleanup! If you’re decorating with kids, squeeze bottles are easier for little hands than piping bags.
Preparation Method
- Make the Dough: In a large bowl, whisk together 2 1/2 cups (315g) flour, 1/2 tsp baking powder, and 1/4 tsp salt. Set aside. Cream 3/4 cup (170g) butter and 1 cup (200g) sugar with an electric mixer until pale and fluffy (about 2-3 minutes). Beat in 1 egg and 1 1/2 tsp vanilla until just combined.
- Add Color: Mix in orange gel food coloring until the dough is a bright pumpkin shade. Start with a little and add more as needed—the color intensifies after baking.
- Combine Dry and Wet: Slowly add the flour mixture to the wet ingredients, mixing just until a soft dough forms. If it feels sticky, add 1-2 tbsp more flour.
- Chill: Wrap dough in plastic and chill for 30-45 minutes. Chilling helps it hold shape and makes rolling easier.
- Preheat & Prep: Preheat oven to 350°F (175°C). Line baking sheets with parchment paper.
- Shape Cookies: Roll out dough on a floured surface to 1/4-inch (6mm) thickness. Cut out pumpkin shapes in pairs (for tops and bottoms). You should get 18-20 pairs from this batch.
- Make Faces: Use a small knife or toothpick to carve out eyes, noses, and grins on half the cookies (these will be the tops). Don’t worry if they’re a bit uneven—it adds charm!
- Add Chocolate: Place a piece (about 1/2 tbsp) of milk chocolate or a few chips in the center of each bottom cookie. Gently press the face cookie on top and seal edges by pinching lightly. If edges crack, patch with a dab of dough.
- Bake: Bake cookies 10-12 minutes, until edges are set and bottoms are lightly golden. Faces should look crisp but not browned. (Keep an eye on them—overbaking dries out the chocolate!)
- Cool: Transfer cookies to a rack. If any chocolate leaks, don’t worry—just trim with a knife once cooled.
- Decorate: Once cool, pipe black gel or melted chocolate into the face details. Add a green stem with icing. Sprinkle with sanding sugar if you like.
- Serve: Let decorations set for 10 minutes before stacking or plating. Enjoy warm for a melty center, or at room temp for the classic cookie texture.
Preparation Notes: If your dough gets too soft while working, pop it back in the fridge for 10 minutes. Chocolate chips work best for minimal leakage, but chopped bars give a gooier center. Faces don’t need to be perfect—half the fun is seeing what you end up with! If you mess up a face, just press on a little extra dough and try again.
Cooking Tips & Techniques
Having baked these milk chocolate stuffed Jack O Lantern cookies more times than I can count, I’ve picked up a few tricks that really make a difference. First, keep your dough chilled—warm dough gets sticky and tough to manage, especially when you’re cutting shapes. If you’re working in a warm kitchen (hello, busy Halloween night!), split the dough in half and keep one piece in the fridge while you work with the other.
One common mistake is overfilling the cookies with chocolate. I know, it’s tempting to go big, but stick to about 1/2 tablespoon per cookie or you’ll end up with chocolate oozing everywhere. If you do get leaks, just trim the edges after baking—no one will know! Another tip: use parchment paper for rolling and baking. It saves you a ton of cleanup and keeps cookies from sticking.
I’ve learned (the hard way) that rushing the chilling step makes the cookies spread and lose their shape. Give the dough time to firm up for neat pumpkins. For multitasking, prep your chocolate filling and decorating gels while the dough chills. If you want perfectly crisp edges, dip your cutter in flour before each cut. And for consistent baking, rotate your trays halfway through—my oven always browns the back row a touch faster.
Don’t stress about getting every face perfect. The best cookies are the ones with personality! If you want extra shine on your pumpkins, brush with a little milk before baking. And finally, let the cookies cool fully before decorating—otherwise, your icing will melt and run. Learned that one the messy way!
Variations & Adaptations
If you want to switch things up, these milk chocolate stuffed Jack O Lantern cookies are super adaptable. Here are some of my favorite variations:
- Gluten-Free: Replace the all-purpose flour with a gluten-free blend. Cookies stay soft and festive—just check the dough for stickiness and add a pinch more flour if needed.
- Vegan: Use vegan butter, a flax egg, and dairy-free chocolate chips. Honestly, they taste just as good (my vegan neighbor swears by this version)!
- Flavor Twists: Add 1/2 tsp pumpkin pie spice or a pinch of cinnamon to the dough for a cozy autumn flavor. Or swap the milk chocolate for white chocolate, caramel squares, or peanut butter cups for a new spin.
- Different Cooking Methods: Want crispy cookies? Roll the dough thinner (1/8-inch) and bake for 8-9 minutes. Prefer softer cookies? Chill the dough longer and roll a bit thicker.
- Allergen Substitutions: For nut allergies, stick to classic chocolate. For dairy allergies, use Enjoy Life chocolate chips and Earth Balance butter.
- Personal Favorite: Last Halloween, I swapped half the chocolate for chopped mini marshmallows. It made a gooey, s’mores-inspired center—total crowd-hit!
Customize the faces with colored gels, sprinkles, or even a drizzle of caramel. If you want non-Halloween cookies, use star or heart-shaped cutters and change up the colors. The basic dough and stuffing method works year-round!
Serving & Storage Suggestions
These milk chocolate stuffed Jack O Lantern cookies are best served at room temperature or slightly warm (pop them in the microwave for 10 seconds if you want a gooey center). I love stacking them on a festive platter surrounded by candy corn, mini pumpkins, or spooky napkins for that classic Halloween look. If you’re serving at a party, pair with apple cider or hot cocoa—it’s a killer combo.
For storage, let the cookies cool completely, then layer in an airtight container between sheets of parchment. They stay soft for up to 4 days at room temperature. For longer storage, freeze in a zip-top bag for up to 2 months. To thaw, just set out at room temp for 30 minutes (no need to reheat unless you want melted chocolate). If you like your cookies extra soft, add a slice of bread to the container—it keeps them tender!
Flavors actually deepen on day two, so if you can resist eating them all at once, they’re even better as leftovers. When reheating, go low and slow—microwave in short bursts or warm in a low oven (300°F/150°C) for 3-4 minutes. Avoid microwaving too long or the chocolate will seize up. These cookies make great lunchbox treats or edible Halloween gifts too—just wrap in cellophane with a ribbon for instant smiles!
Nutritional Information & Benefits
Each milk chocolate stuffed Jack O Lantern cookie (based on a batch of 20) has roughly:
- Calories: 180
- Fat: 8g
- Carbs: 24g
- Sugar: 13g
- Protein: 2g
Key ingredients like milk chocolate provide a little calcium and antioxidants, while the butter adds rich flavor and helps with satiety. The cookies are nut-free (unless you swap in nutty fillings) and can be made gluten-free or vegan with simple substitutions. If you’re watching sugar or carbs, you can halve the amount of chocolate or use a low-sugar chocolate brand. Allergy note: contains wheat, dairy, eggs (unless swapped).
Honestly, these aren’t exactly health food, but they’re a great way to get kids (and adults!) involved in baking and celebrating. My wellness philosophy is all about balance—enjoying treats in moderation, especially when they bring a little seasonal joy. If you’re after a fun, festive snack that’s easy to share, these cookies fit right in.
Conclusion
So there you have it—milk chocolate stuffed Jack O Lantern cookies that are as festive and fun as Halloween itself. They’re easy to make, endlessly customizable, and guaranteed to delight everyone from little goblins to grown-up ghosts. Whether you’re baking for a party or just want a cozy kitchen project, this recipe delivers flavor, creativity, and a little bit of magic in every bite.
I love these cookies because they turn a simple sugar cookie into something special, with that creamy chocolate center and the chance to make each pumpkin face unique. If you’re eager to try something new this Halloween, give these a shot and let your imagination run wild. Don’t forget to leave a comment below if you try them—share your funniest faces or your favorite twists! And if you love this recipe, pin it, share it, or tag me on social media with your spooky creations. Happy baking and happy haunting!
Now, grab your mixer and your cookie cutters—the most irresistible Halloween treat is just a bake away!
FAQs
Can I use dark or white chocolate instead of milk chocolate?
Absolutely! You can swap the filling for any chocolate you love—dark, white, or even caramel candies work great.
How do I keep my cookies from spreading too much?
Make sure to chill your dough before rolling and baking. If your kitchen is warm, chill cut shapes for 10 minutes before baking.
Can I make these cookies ahead of time?
Yes, you can bake and decorate up to 2 days in advance. Store in an airtight container at room temp, or freeze for up to 2 months.
What’s the best way to decorate the faces?
Use black writing gel, melted chocolate, or royal icing for details. Toothpicks or piping bags help with small lines and shapes.
Can I make these cookies gluten-free or vegan?
Sure! Use a gluten-free flour blend and vegan butter/egg substitutes. Dairy-free chocolate chips work perfectly for the filling.
Pin This Recipe!
Milk Chocolate Stuffed Jack O Lantern Cookies
- Total Time: 1 hour 20 minutes
- Yield: 18-20 cookies 1x
Description
Festive Halloween sugar cookies stuffed with creamy milk chocolate and decorated with playful pumpkin faces. These cookies are easy to make, fun to decorate, and perfect for parties or cozy fall baking.
Ingredients
- 2 1/2 cups all-purpose flour (plus extra for rolling)
- 1/2 tsp baking powder
- 1/4 tsp salt
- 3/4 cup unsalted butter, softened
- 1 cup granulated sugar
- 1 large egg, room temperature
- 1 1/2 tsp pure vanilla extract
- Orange gel food coloring
- 5 oz milk chocolate bars or chocolate chips
- Black writing gel or melted chocolate (for faces)
- Green writing gel or green icing (for stems)
- Optional: colored sprinkles or sanding sugar
Instructions
- In a large bowl, whisk together flour, baking powder, and salt. Set aside.
- Cream butter and sugar with an electric mixer until pale and fluffy (2-3 minutes).
- Beat in egg and vanilla until just combined.
- Mix in orange gel food coloring until dough is a bright pumpkin shade.
- Slowly add flour mixture to wet ingredients, mixing just until a soft dough forms. Add 1-2 tbsp more flour if sticky.
- Wrap dough in plastic and chill for 30-45 minutes.
- Preheat oven to 350°F (175°C). Line baking sheets with parchment paper.
- Roll out dough on a floured surface to 1/4-inch thickness. Cut out pumpkin shapes in pairs (tops and bottoms).
- Use a small knife or toothpick to carve out faces on half the cookies (tops).
- Place about 1/2 tbsp milk chocolate or a few chips in the center of each bottom cookie. Gently press a face cookie on top and seal edges.
- Bake 10-12 minutes, until edges are set and bottoms are lightly golden.
- Transfer cookies to a rack to cool.
- Once cool, decorate faces with black gel or melted chocolate and add green stems with icing. Sprinkle with sanding sugar if desired.
- Let decorations set for 10 minutes before serving.
Notes
Chill dough for best shape and texture. Use parchment paper for easy cleanup. Faces don’t need to be perfect—personality is key! For gluten-free or vegan options, substitute flour, butter, and egg as needed. Store cookies in an airtight container for up to 4 days or freeze for 2 months.
- Prep Time: 25 minutes
- Cook Time: 12 minutes
- Category: Dessert
- Cuisine: American
Nutrition
- Serving Size: 1 cookie
- Calories: 180
- Sugar: 13
- Sodium: 60
- Fat: 8
- Saturated Fat: 5
- Carbohydrates: 24
- Fiber: 1
- Protein: 2
Keywords: Halloween cookies, stuffed cookies, milk chocolate, pumpkin cookies, festive dessert, kid-friendly, party treats, sugar cookies, fall baking