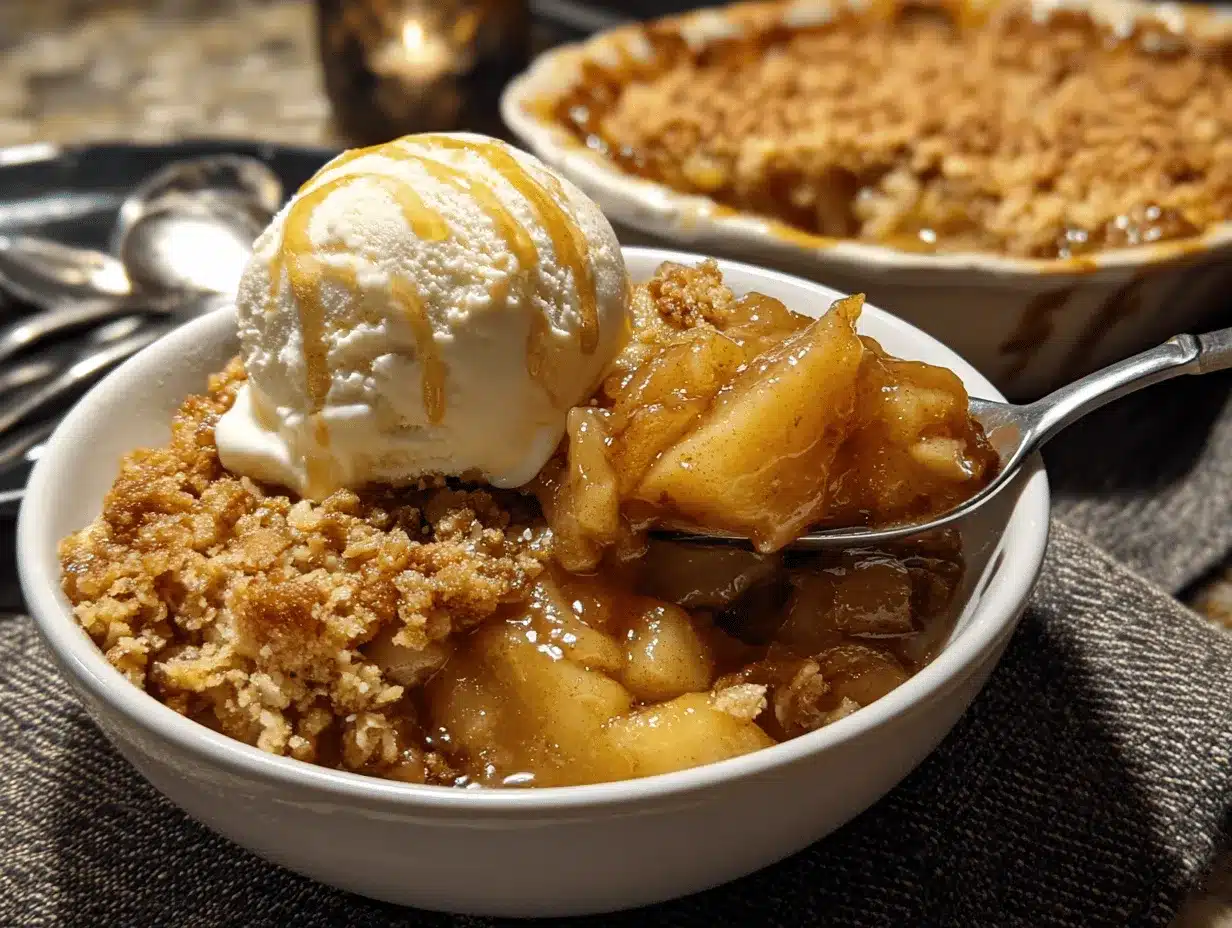
Warm cinnamon-spiced apples bubbling under a thick, golden layer of buttery crunch—honestly, Grandma’s apple crisp recipe is pure nostalgia in a baking dish. The first time I tried it, I was nine and could barely wait for it to cool (let’s just say, my tongue learned a lesson the hard way). The kitchen filled with the sweet scent of apples and brown sugar, and I remember thinking, “This is what comfort smells like.” Over the years, I’ve tweaked the crisp topping—making it extra thick and crunchy, just like Grandma did when she wanted to spoil us. And you know, the secret’s all in the topping. If you’ve ever wanted that perfect balance between gooey fruit and a crisp that stays crunchy even after a day or two, this is the apple crisp recipe you’ve been searching for.
If you love simple, classic desserts that never go out of style, Grandma’s apple crisp recipe is your new go-to. It’s made with everyday ingredients, no fancy tricks, and you don’t have to fuss with pie dough. Every time I serve this, people ask for seconds—and the recipe. It’s especially popular with families, busy parents, or anyone who wants something homemade but fuss-free. Plus, the extra crisp topping makes it stand out from every other apple crisp I’ve tried (and let’s face it, I’ve baked a lot). Whether you’re baking for a holiday or just craving something sweet on a Tuesday, this is apple crisp at its absolute best.
I’ve tested this recipe more times than I can count, swapped apples, added nuts, and played with different sugars. Honestly, it never disappoints. As someone who’s spent years developing and sharing recipes, I trust Grandma’s apple crisp for its reliability—each bite is packed with cozy flavor and crunch. You’ll see why this extra crisp topping is worth every minute in the kitchen!
Why You’ll Love This Recipe
- Quick & Easy: Comes together in just about 15 minutes of prep—perfect for busy nights or when you get a last-minute sweet tooth.
- Simple Ingredients: No weird ingredients or special store trips. Apples, oats, flour, and a few pantry staples—chances are, you’ve got it all right now!
- Extra Crisp Topping: This isn’t your ordinary apple crisp. The topping is double-thick, super crunchy, and stays crisp even after refrigerating.
- Perfect for Any Occasion: Ideal for family dinners, potlucks, fall gatherings, or when you just need a classic dessert for a cozy night in.
- Crowd-Pleaser: Kids love the sweet, tender apples, and adults go wild for the crisp topping. It disappears faster than you’d expect!
- Unbelievably Delicious: The combo of tart apples, cinnamon, and buttery crumble is everything you want in comfort food.
What really makes Grandma’s apple crisp recipe different? It’s all about the topping. Most crisps are modest, but here we go bold—twice the crunch, a hint of salt, and just the right amount of brown sugar. I blend old-fashioned oats with flour and cold butter, using my hands (messy, but so worth it) to get those big, chunky clumps. You know the kind: a little messy, a little uneven, but seriously crave-worthy.
This recipe is close to my heart because it delivers on flavor, texture, and memories. It’s the kind of dessert that makes you pause and savor. Whether you’re baking for yourself or a big group, it’s guaranteed to impress—without any stress. Trust me, once you taste that extra crisp topping, you’ll never go back!
Ingredients Needed
This apple crisp recipe uses straightforward, wholesome ingredients to create bold flavor and a satisfying, crunchy texture. Most of these are pantry staples, and you can swap a few depending on what you have or need.
- For the Apple Filling:
- 6 large apples (about 2 1/2 pounds / 1.1 kg), peeled, cored, and sliced (I love using Granny Smith for tartness, mixed with Honeycrisp for sweetness)
- 1/4 cup (50 g) granulated sugar (adjust for sweeter apples)
- 2 tablespoons (15 g) all-purpose flour (helps thicken the juices)
- 1 teaspoon ground cinnamon (for that classic flavor)
- 1/8 teaspoon ground nutmeg (optional, but adds warmth)
- 1 tablespoon (15 ml) fresh lemon juice (keeps apples bright and balances sweetness)
- For the Extra Crisp Topping:
- 1 cup (120 g) all-purpose flour
- 1 cup (100 g) old-fashioned rolled oats (don’t use quick oats—they get mushy)
- 1 cup (200 g) brown sugar, packed (light or dark works—dark gives richer flavor)
- 1/2 cup (115 g) unsalted butter, cold and cubed (I prefer Kerrygold for flavor, but any good butter works)
- 1/2 teaspoon salt (balances the sweetness)
- 1/2 teaspoon ground cinnamon (more cinnamon = more comfort!)
- 1/2 cup (55 g) chopped pecans or walnuts (optional, adds extra crunch and nutty flavor)
- For Serving:
- Vanilla ice cream or whipped cream (optional, but highly recommended)
Ingredient Tips: If you’re gluten-free, swap the flour for a 1:1 gluten-free blend and make sure your oats are certified gluten-free. Dairy-free? Use vegan butter—Earth Balance works well. For less sugar, try coconut sugar instead of brown. And if you prefer a nut-free crisp, just skip the pecans/walnuts.
The apples are the star, so pick ones that hold their shape when baked. I usually grab whatever looks best at the market. If it’s summer, swap apples for peaches or berries (just adjust the sugar if your fruit is sweeter). Grandma always said, “Use what you have—make it yours.”
Equipment Needed
- 9×13-inch (23×33 cm) baking dish (glass or ceramic works great—metal browns the edges faster)
- Large mixing bowl (for tossing apples)
- Medium mixing bowl (for the crisp topping)
- Peeler and corer (a good apple peeler saves loads of time—Grandma always used a simple paring knife)
- Pastry cutter or fork (for blending butter into the topping—your hands work fine too)
- Measuring cups and spoons
- Rubber spatula or wooden spoon
If you don’t have a pastry cutter, just use your fingers—the warmth helps break up the butter nicely. For a budget-friendly option, I’ve even used two butter knives in a crisscross motion (it’s a little slower, but gets the job done). My favorite baking dish is the old Pyrex my grandma handed down, but any sturdy pan will do. Just check for chips or cracks if you’re pulling out something vintage.
For easy cleanup, I sometimes line the dish with parchment paper—especially if I know leftovers are going straight into the fridge. And if you’re using a metal pan, keep an eye on the edges at the end—they brown a bit faster than glass.
Preparation Method
- Prep the apples: Peel, core, and slice 6 large apples into 1/4-inch (6 mm) thick pieces. Toss them in a large bowl with 1/4 cup (50 g) granulated sugar, 2 tablespoons (15 g) flour, 1 teaspoon cinnamon, 1/8 teaspoon nutmeg (if using), and 1 tablespoon (15 ml) lemon juice. Mix until all slices are evenly coated—look for a light dusting and a citrusy scent.
- Transfer the apples: Pour the apple mixture into a greased 9×13-inch (23×33 cm) baking dish. Spread out evenly; the apples should fill the dish about halfway. If you see a bit of extra juice at the bottom, that’s normal—it’ll help create a gooey base.
- Make the extra crisp topping: In a medium bowl, combine 1 cup (120 g) flour, 1 cup (100 g) oats, 1 cup (200 g) brown sugar, 1/2 teaspoon salt, and 1/2 teaspoon cinnamon. Stir to blend.
- Add the butter: Add 1/2 cup (115 g) cold, cubed unsalted butter to the topping mix. Use a pastry cutter, fork, or your fingers to work the butter in until you have pea-sized clumps and some sandy bits. The mix should be crumbly but stick together slightly when squeezed.
- Add nuts (optional): Stir in 1/2 cup (55 g) chopped pecans or walnuts. If you want big, chunky clusters, squeeze some topping together to form larger pieces.
- Top the apples: Sprinkle the crisp topping evenly over the apple layer. Don’t press down—let it stay loose for maximum crunch. Make sure you cover all the apples; uneven bits are okay (they crisp up beautifully).
- Bake: Bake at 350°F (175°C) for 40–45 minutes. The topping should be deep golden brown and the apples bubbling at the edges. If you notice the topping browning too quickly, loosely cover with foil for the last 10 minutes.
- Cool: Let the apple crisp cool for at least 15–20 minutes before serving. The filling thickens and the topping crisps up even more as it sits.
- Serve: Scoop into bowls while still warm. Top with vanilla ice cream or whipped cream if you like. The first spoonful should have a satisfying crunch and sweet apple aroma!
Troubleshooting: If your topping looks dry, add a tablespoon of melted butter before baking. If the apples are too juicy, sprinkle a bit more flour on top before adding the crisp. For even baking, rotate your dish halfway through if your oven has hot spots.
Personal Tip: I always check the apples at the 35-minute mark. If they’re soft and bubbly but the topping isn’t crisp enough, switch on the broiler for 1–2 minutes—watch closely so it doesn’t burn!
Cooking Tips & Techniques
If you want that signature crunch in Grandma’s apple crisp recipe, here are a few key tips I’ve picked up over years (and a few baking mishaps):
- Cold Butter Is Key: Always start with cold, cubed butter for the topping. Warm or melted butter makes the topping soggy—trust me, I’ve accidentally tried it.
- Don’t Overmix: Mix the topping just until clumpy. If you blend it into a dough, it bakes up dense instead of crisp.
- Oven Position Matters: Bake in the center of the oven. Too high, and the topping browns before the apples soften; too low, and the bottom can get mushy.
- Apple Choice: Mixing tart and sweet apples gives more depth. Too tart? Add a bit more sugar. Too sweet? A dash more lemon juice fixes it up.
- Chunky Topping: For extra crunch, squeeze some topping into larger clusters before putting it on the apples. These bake into super crispy bites.
- Watch for Soggy Spots: If you spot soggy patches after baking, leave the crisp uncovered as it cools. Steam escapes, and the topping firms up.
- Timing & Multitasking: While the crisp bakes, whip up some homemade whipped cream or set the table. It’s a good way to use the waiting time and get everything ready to serve warm.
I’ve had a few batches where the topping was too thin—now I always make extra. If you want more, just double the topping portion and save leftovers for a mini batch. Consistency is all about balancing the topping and fruit; don’t be shy with the crisp! Every oven’s a bit different, so keep an eye on yours the first time.
Variations & Adaptations
Grandma’s apple crisp recipe is super flexible—here are some easy ways to make it your own:
- Gluten-Free: Substitute the flour with a 1:1 gluten-free blend and use certified gluten-free oats. The texture stays amazing!
- Dairy-Free: Swap unsalted butter for a vegan alternative like Earth Balance or Miyoko’s. The crisp still bakes up golden and crunchy.
- Seasonal Fruit Swap: Use pears, peaches, or mixed berries instead of apples. Just watch the sugar—some fruits are sweeter and need less.
- Nut-Free: Omit the pecans/walnuts or use seeds (like pumpkin or sunflower) for crunch without allergens.
- Flavor Twist: Add dried cranberries or raisins to the apple layer. Or stir 1/4 teaspoon cardamom into the topping for a warm, floral note.
- Cooking Method: Make individual crisps in ramekins—reduce bake time to 25–30 minutes. Or bake in a cast-iron skillet for rustic presentation.
My personal favorite? Swapping half the apples for fresh pears and adding chopped hazelnuts to the topping. It’s a little unexpected, but it’s now my go-to for winter gatherings. Don’t be afraid to experiment—Grandma always encouraged adding your own touch!
Serving & Storage Suggestions
Serve Grandma’s apple crisp recipe warm—straight from the oven is best. For presentation, scoop generous servings into bowls and top with a big scoop of vanilla ice cream (the cold ice cream melts into the warm crisp… it’s heavenly!). Whipped cream or a drizzle of caramel sauce is also a hit.
Pair with hot coffee, chai tea, or even spiced cider for a cozy dessert. If you’re serving a crowd, set out a toppings bar with nuts, sauces, and ice cream flavors—everyone can customize their bowl.
For storage, cover leftovers tightly and refrigerate for up to 4 days. The topping stays crisp if you leave the dish uncovered until it’s room temperature before sealing. To freeze, wrap tightly in foil and store for up to 2 months. Reheat single servings in the microwave (30–45 seconds) or rewarm in the oven at 350°F (175°C) for 10–15 minutes. The flavors deepen as it sits overnight—sometimes, the second-day crisp is even better!
Nutritional Information & Benefits
| Serving Size | Calories | Carbs | Protein | Fat | Fiber |
|---|---|---|---|---|---|
| 1/8 of recipe | ~320 | 55g | 3g | 11g | 5g |
Apples are packed with vitamin C, fiber, and antioxidants. Oats add whole grains and help keep you full. Pecans or walnuts contribute healthy fats and a bit of extra protein. If you use less sugar and add nuts, it’s a satisfying treat that fits into most balanced diets. Just watch out for gluten or dairy if you have sensitivities—adapt as needed. For me, it’s the ultimate comfort food with a little nutrition boost!
Conclusion
If you’re craving a dessert that’s easy, cozy, and absolutely delicious, Grandma’s apple crisp recipe with extra crisp topping is a must-try. The double-thick crunchy layer and tender, cinnamon apples make it a hit for every occasion. I love how it brings people together—whether it’s a holiday or a simple weeknight treat, it never fails to make the house feel like home.
Don’t be afraid to play around with the recipe—try different fruits, add your favorite nuts, or tweak the spice. The best recipes become yours with a personal touch. For me, it’s those imperfect crunchy clusters and juicy apples that keep me coming back.
Have you tried this recipe? Share your twists or questions in the comments—I’d love to hear how you make it your own! Pin, share, or save it for later, and let’s keep grandma’s apple crisp tradition going strong. Happy baking!
FAQs
Can I use any type of apple for Grandma’s apple crisp recipe?
Almost any apple works, but Granny Smith and Honeycrisp are my favorites for their balance of tart and sweet. Mixing varieties gives the best flavor and texture!
How do I keep the crisp topping crunchy?
Use cold butter and don’t overmix. Let the crisp cool uncovered—steam escaping helps the topping stay crunchy.
Can I make this apple crisp ahead of time?
Yes! Bake, cool, and refrigerate. Reheat in the oven for 10–15 minutes at 350°F (175°C) to revive the crunch.
How do I make this recipe gluten-free?
Swap the flour for a 1:1 gluten-free blend and use certified gluten-free oats. The crisp topping still turns out great!
What’s the best way to serve apple crisp?
Warm with vanilla ice cream or whipped cream. For extra fun, try a toppings bar—nuts, caramel sauce, or extra cinnamon!
Pin This Recipe!
Grandma’s Apple Crisp Recipe: Easy Extra Crisp Topping Guide
- Total Time: 60 minutes
- Yield: 8 servings 1x
Description
This classic apple crisp features warm, cinnamon-spiced apples under a double-thick, buttery, crunchy topping. It’s easy to make, crowd-pleasing, and perfect for cozy nights or festive gatherings.
Ingredients
- 6 large apples (about 2 1/2 pounds), peeled, cored, and sliced (Granny Smith and Honeycrisp recommended)
- 1/4 cup granulated sugar
- 2 tablespoons all-purpose flour
- 1 teaspoon ground cinnamon
- 1/8 teaspoon ground nutmeg (optional)
- 1 tablespoon fresh lemon juice
- 1 cup all-purpose flour
- 1 cup old-fashioned rolled oats
- 1 cup brown sugar, packed (light or dark)
- 1/2 cup unsalted butter, cold and cubed
- 1/2 teaspoon salt
- 1/2 teaspoon ground cinnamon
- 1/2 cup chopped pecans or walnuts (optional)
- Vanilla ice cream or whipped cream (for serving, optional)
Instructions
- Preheat oven to 350°F (175°C). Grease a 9×13-inch baking dish.
- Peel, core, and slice apples into 1/4-inch thick pieces. Toss in a large bowl with granulated sugar, flour, cinnamon, nutmeg (if using), and lemon juice until evenly coated.
- Pour apple mixture into the prepared baking dish and spread evenly.
- In a medium bowl, combine flour, oats, brown sugar, salt, and cinnamon for the topping. Stir to blend.
- Add cold, cubed butter to the topping mix. Use a pastry cutter, fork, or your fingers to work the butter in until you have pea-sized clumps and some sandy bits.
- Stir in chopped pecans or walnuts if using. Squeeze some topping together to form larger clusters for extra crunch.
- Sprinkle the crisp topping evenly over the apples. Do not press down.
- Bake for 40–45 minutes, until the topping is deep golden brown and the apples are bubbling at the edges. If topping browns too quickly, loosely cover with foil for the last 10 minutes.
- Let cool for at least 15–20 minutes before serving to allow the filling to thicken and the topping to crisp.
- Serve warm, topped with vanilla ice cream or whipped cream if desired.
Notes
For gluten-free, use a 1:1 gluten-free flour blend and certified gluten-free oats. For dairy-free, substitute vegan butter. Mix tart and sweet apples for best flavor. Squeeze topping into clusters for extra crunch. Let crisp cool uncovered for maximum crunch. Store leftovers tightly covered in the fridge for up to 4 days; reheat in oven to revive topping.
- Prep Time: 15 minutes
- Cook Time: 40–45 minutes
- Category: Dessert
- Cuisine: American
Nutrition
- Serving Size: 1/8 of recipe
- Calories: 320
- Sugar: 32
- Sodium: 160
- Fat: 11
- Saturated Fat: 6
- Carbohydrates: 55
- Fiber: 5
- Protein: 3
Keywords: apple crisp, easy dessert, extra crisp topping, classic apple crisp, fall dessert, comfort food, family recipe, cinnamon apples, oat topping, holiday dessert