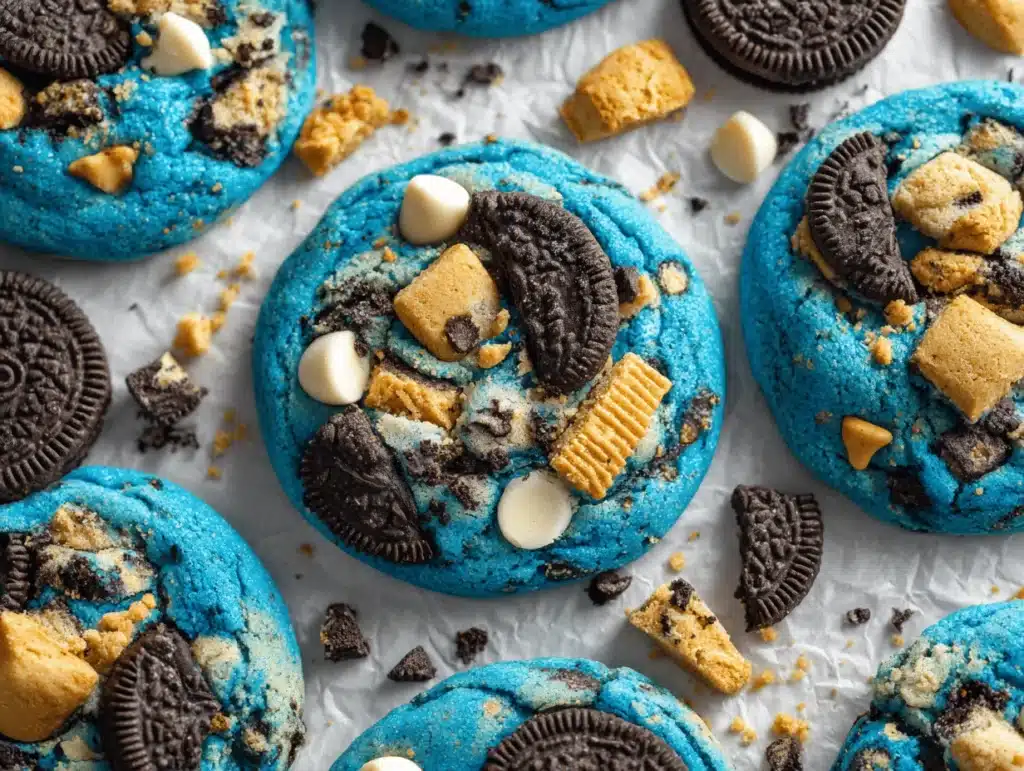
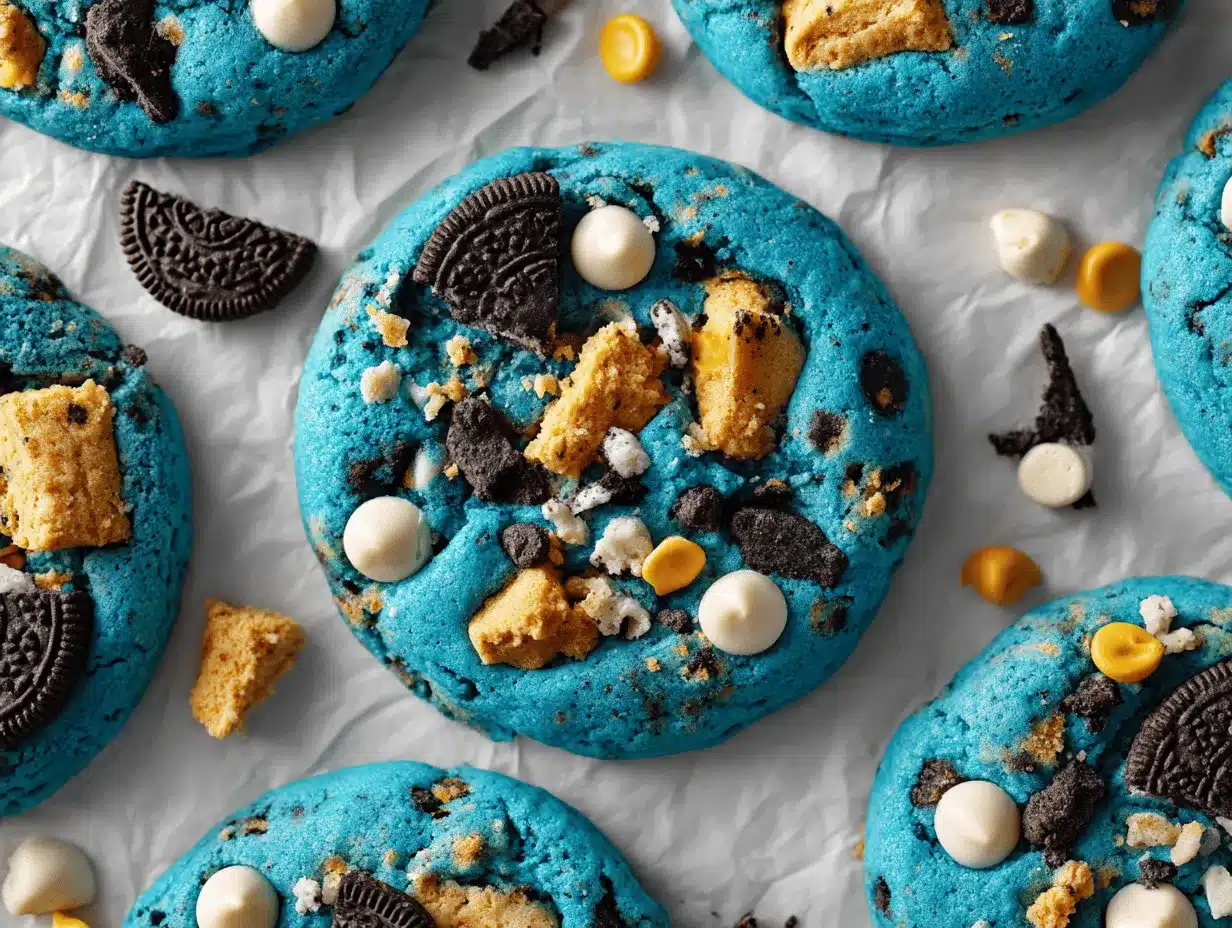
Bright blue, gooey, and loaded with chunky bits—these Cookie Monster Cookies are the kind of treat that makes kids squeal and grownups grin. The first time I made these, my kitchen smelled like a candy shop meets a bakery, and I swear the color alone was enough to spark pure joy. Honestly, there’s something magical about a cookie that looks like it leaped out of a cartoon. (Who can resist those big chocolate eyes and the playful blue hue?)
I stumbled upon the idea for Cookie Monster Cookies one rainy afternoon when my niece begged for something “fun and blue.” I wanted a recipe that was vibrant, easy to customize, and packed full of sweets—kind of like if a cookie and a candy bar had a party. Over the years, I’ve tweaked, tested, and baked these in every possible way. My kitchen has seen blue smudges on every surface, and I’ve learned a few tricks to get just the right shade, chewy texture, and mix-in combo.
This recipe isn’t just a crowd-pleaser—it’s a full-on celebration. It’s perfect for birthday parties, bake sales, or just a Tuesday afternoon pick-me-up. Plus, Cookie Monster Cookies are surprisingly easy to whip up, and you probably have most of the ingredients. Whether you’re baking with kids, prepping for a themed event, or just want to jazz up your cookie game, this recipe delivers bold flavor, a playful look, and a nostalgic taste of childhood. Trust me—these cookies will steal the show, every time.
Why You’ll Love This Recipe
Let’s face it—Cookie Monster Cookies aren’t your average chocolate chip treat. They’re loaded with personality, flavor, and a burst of color that makes every batch unforgettable. After baking these for family gatherings, school events, and even as a “just because” surprise, I can say they always get rave reviews. Here’s why you’ll want to bake them ASAP:
- Quick & Easy: Ready in under 30 minutes, and you don’t need fancy equipment or skills. (Perfect for those impatient little helpers!)
- Simple Ingredients: You probably have everything in your pantry—think flour, butter, sugar, and a few fun extras.
- Perfect for Parties: The bold blue color and playful mix-ins make these a hit at birthdays, bake sales, and themed movie nights.
- Crowd-Pleaser: Kids love them for the colors and candy bits; adults sneak seconds for the chewy texture and rich flavor.
- Unbelievably Delicious: Soft, thick, and packed with chocolate chunks and mini cookies—every bite is a treat.
What sets my Cookie Monster Cookies apart? I blend the blue food coloring right into the butter and sugar, getting that vibrant color all the way through. Plus, I use a mix of semisweet chocolate chips, mini chocolate chip cookies, and crushed Oreos for the ultimate monster mash-up. If you’ve ever wanted a cookie that’s equal parts Instagram-worthy and totally craveable, this is it.
Honestly, these are the cookies that make people say, “Wait, you made these?!” They’re playful, customizable, and endlessly fun. Whether you’re baking with kids or just channeling your inner Cookie Monster, you’ll love every colorful, chunky bite. I’ve tested this recipe dozens of times, and every batch turns out just right—soft, chewy, and packed with goodies.
Ingredients Needed
This recipe uses simple, everyday ingredients to create a gourmet treat that’s both fun and delicious. Most are pantry staples, but a few add that special Cookie Monster magic. Here’s what you’ll need:
- For the Cookie Dough:
- 1 cup (226g) unsalted butter, softened (rich, creamy base)
- 1 cup (200g) granulated sugar
- 1 cup (220g) light brown sugar, packed (deep caramel flavor)
- 2 large eggs, room temperature
- 2 teaspoons vanilla extract (I like Nielsen-Massey for best aroma)
- Blue gel food coloring (Wilton or Americolor work best for vibrant hue)
- 3 cups (375g) all-purpose flour
- 1 teaspoon baking soda
- 1/2 teaspoon salt
- Mix-Ins:
- 1 cup (170g) semisweet chocolate chips (or chunks for extra gooeyness)
- 3/4 cup (75g) mini chocolate chip cookies (Chips Ahoy minis are a fave—adds crunch)
- 3/4 cup (80g) crushed Oreo cookies (classic or Golden Oreos, your call)
- 1/2 cup (80g) white chocolate chips (optional, for extra sweetness)
- Candy eyes (found at most baking aisles—totally optional, but super cute)
- Ingredient Tips:
- Use gel food coloring instead of liquid for deeper color without thinning the dough.
- Swap butter for plant-based spread for dairy-free version (honestly, it works great!)
- Substitute gluten-free all-purpose flour if needed—Bob’s Red Mill is reliable.
- Mix and match your candy bits: M&Ms, chocolate chunks, or even rainbow sprinkles.
- If you can’t find mini cookies, break full-sized ones into quarters.
You’ll notice these ingredients are flexible—feel free to mix up the add-ins based on what’s in your pantry or your family’s favorites. I’ve even tossed in chopped pretzels or peanut butter chips for extra flavor. The blue color is the star, but the mix-ins make every bite unique. Trust me, once you start customizing, you’ll never want plain chocolate chip cookies again!
Equipment Needed
You don’t need a professional kitchen to whip up these Cookie Monster Cookies. Here’s what I use every time:
- Mixing bowls (one large, one medium—glass or stainless work great)
- Hand mixer or stand mixer (a whisk is possible in a pinch, but a mixer makes it easier)
- Rubber spatula (for scraping down the sides and folding in mix-ins)
- Measuring cups and spoons (I prefer metal for accuracy and durability)
- Baking sheets (heavy-duty, rimmed for best results)
- Silicone baking mat or parchment paper (keeps cookies from sticking and makes cleanup easy)
- Cookie scoop (medium size, around 2 tablespoons—helps shape those chunky cookies)
- Cooling rack (for crisp edges and chewy centers)
If you don’t have a cookie scoop, use two spoons to form the dough balls. For mixing, a sturdy wooden spoon works if you’re doing everything by hand. I’ve used both cheap and high-end baking sheets—honestly, as long as you use parchment, you’re good. Pro tip: wash silicone mats with warm, soapy water right after baking to avoid blue stains lingering for days!
Budget-friendly tip: Most tools are available at discount stores, and parchment paper is a lifesaver for sticky doughs. (Trust me, you’ll thank yourself for skipping the scrubbing!)
Preparation Method
Ready to get baking? Here’s my step-by-step guide to making Cookie Monster Cookies at home. I’ve included measurements in both US and metric units, plus some troubleshooting tips. Let’s make those blue beauties!
-
Prep the oven & pans:
Preheat your oven to 350°F (175°C). Line baking sheets with parchment paper or silicone mats. (If you skip this, cookies may stick and blue color can stain pans.) -
Cream the butter and sugars:
In a large mixing bowl, beat 1 cup (226g) unsalted butter, 1 cup (200g) granulated sugar, and 1 cup (220g) light brown sugar until fluffy and pale—about 2-3 minutes. If the butter’s too cold, just let it sit out 10 minutes longer. -
Add eggs & vanilla:
Beat in 2 large eggs (room temp) and 2 teaspoons vanilla extract until well combined. Scrape down the sides of the bowl with a spatula for even mixing. -
Color it blue:
Add blue gel food coloring—a little at a time—until you get a vibrant Cookie Monster shade. I usually use about 1/2 teaspoon (Wilton or Americolor gel). Mix well so the color is evenly distributed.
Note: If the color looks dull, add a tiny bit more gel. Too much, and the dough can taste bitter, so go slow. -
Mix dry ingredients:
In a separate bowl, whisk together 3 cups (375g) all-purpose flour, 1 teaspoon baking soda, and 1/2 teaspoon salt. -
Combine wet and dry:
Gradually add the dry mixture into the blue dough, mixing on low speed. Dough should be thick and slightly sticky. If it’s too dry, add 1 tablespoon milk; too wet, add 1 tablespoon flour. -
Add mix-ins:
Fold in 1 cup (170g) semisweet chocolate chips, 3/4 cup (75g) mini chocolate chip cookies, 3/4 cup (80g) crushed Oreos, and 1/2 cup (80g) white chocolate chips (optional). Save a few cookies and chips for pressing on top. -
Shape the cookies:
Use a medium cookie scoop (about 2 tablespoons) to portion dough onto prepared sheets, spacing about 2 inches (5cm) apart. Press extra mix-ins and candy eyes on top for that “monster” look. -
Bake:
Bake for 10-12 minutes, until edges are set but centers look slightly underdone. (They’ll firm up as they cool!) Watch closely—overbaking makes them dry. -
Cool:
Let cookies rest on the sheet for 3-5 minutes, then transfer to a cooling rack. Resist the urge to eat right away—hot cookies can fall apart!
Troubleshooting:
- If cookies spread too much, chill the dough for 30 minutes before baking.
- Too pale? Use more gel coloring, but add in small increments.
- Dough too sticky? Dust hands lightly with flour when shaping.
- If mix-ins sink, press a few extras onto the tops right before baking.
Personal Tip: I always bake a test cookie first to check color, bake time, and texture. (One little blue cookie saves a whole batch from disaster!) These cookies are at their best when the edges are just set and the centers are soft. Enjoy the smell—it’s pure happiness.
Cooking Tips & Techniques
Let me share a few secrets I’ve learned after making Cookie Monster Cookies more times than I can count:
- Chill the dough: If you want thicker cookies, chill the dough for at least 30 minutes. It helps the cookies hold their shape and keeps the color vibrant.
- Use gel food coloring: Liquid coloring can make the dough runny. Gel stays bright and doesn’t affect texture.
- Don’t overmix: After adding the dry ingredients, mix just until combined. Too much mixing can make cookies tough.
- Space cookies: These spread a bit, so leave at least 2 inches between scoops.
- Press mix-ins on top: For a true “monster” look, gently press extra mini cookies, Oreos, and candy eyes onto each ball of dough just before baking.
- Watch the bake time: Every oven’s different. Start checking at 10 minutes—edges should be set, centers soft.
- Let them cool: Warm cookies are fragile. Give them a few minutes on the sheet, then cool completely for the best texture.
- Personal fail: I once used too much liquid coloring and ended up with flat, sticky cookies. Always start with less and add more if needed!
I usually multitask by prepping mix-ins while the dough chills. If you’re baking with kids, let them help decorate—those candy eyes are a blast to place! For consistent results, use a cookie scoop and rotate your pans halfway through baking. These small steps keep batches even and always picture-perfect.
Variations & Adaptations
Cookie Monster Cookies are super customizable. Here are a few ways to mix it up:
- Gluten-Free: Use a certified gluten-free flour blend in place of all-purpose. Bob’s Red Mill works well, and nobody will notice the difference.
- Dairy-Free: Swap butter for plant-based spread and use dairy-free chocolate chips. I’ve tried Earth Balance, and it’s honestly delicious.
- Seasonal Twist: For Halloween, use orange gel coloring and candy corn; at Christmas, go for red and green M&Ms instead of blue.
- Flavor Boost: Add 1/2 teaspoon almond extract or a pinch of cinnamon for a unique twist.
- Allergen Substitutions: Use sunflower seed butter in place of butter if nut allergies are a concern. Omit Oreos for a nut-free, simpler cookie.
- Personal Favorite: I love swapping in chopped pretzels for extra crunch and a hint of saltiness—so good!
You can also bake these as cookie bars—just spread the dough in a lined pan and bake 20-25 minutes. For a smaller batch, halve the recipe. Honestly, these cookies are all about fun, so don’t be afraid to experiment!
Serving & Storage Suggestions
Cookie Monster Cookies are best served fresh and slightly warm, when the chocolate is still melty and the blue color pops. Pile them up on a bright plate or a fun tiered stand—kids love grabbing the biggest one with the most mix-ins!
- Serving: Serve at room temperature or slightly warm. These pair perfectly with cold milk, hot cocoa, or even vanilla ice cream for a decadent dessert.
- Presentation: Stack cookies in a clear jar or arrange them on a colorful platter. Add a few extra candy eyes around for a playful touch.
- Storage: Keep in an airtight container at room temperature for up to 4 days. For longer storage, freeze cookies in a single layer, then transfer to a freezer bag—good for up to 2 months.
- Reheating: Warm frozen cookies in the microwave for 10-15 seconds or in a 300°F (150°C) oven for 3-4 minutes. They’ll taste fresh-baked again!
- Flavor Development: The cookies get chewier after a day, and flavors meld—so if you can resist, save a few for tomorrow!
I always hide a few in the freezer for surprise snack attacks. (Just don’t tell my kids!)
Nutritional Information & Benefits
Here’s an estimate per Cookie Monster Cookie (based on 24 cookies):
- Calories: ~220
- Fat: 10g
- Saturated Fat: 6g
- Carbohydrates: 30g
- Sugar: 18g
- Protein: 2g
Health Highlights: These cookies are a treat, but using real butter and quality chocolate adds calcium and antioxidants. Swap in gluten-free or dairy-free options as needed for dietary needs. Watch out for wheat, dairy, and egg allergens—easy to substitute with the tips above.
From a wellness perspective, I believe treats like Cookie Monster Cookies are about joy and balance. I like making them with my kids as part of our “bake together, enjoy together” tradition. (And sometimes, a bright blue cookie is exactly what the doctor ordered!)
Conclusion
Cookie Monster Cookies aren’t just a baking project—they’re a full-on experience. From the playful color to the chunky mix-ins, every bite is a sweet celebration of fun and flavor. I love this recipe because it brings people together—kids get creative, grownups get nostalgic, and everyone gets to indulge in something a little whimsical.
Don’t be afraid to switch up the mix-ins, play with colors, or make a batch just for yourself. The best part? These cookies are as easy as they are impressive, and they always spark smiles (and maybe a little blue tongue).
If you try these Cookie Monster Cookies, leave a comment below, share your photos, or tag me on social media—I can’t wait to see your monster creations! Happy baking, and may your cookie jar always be full of fun.
Frequently Asked Questions
How do I get the bright blue color in Cookie Monster Cookies?
Use gel food coloring instead of liquid. Start with 1/2 teaspoon and add more as needed for a vibrant shade. Mix thoroughly to avoid streaks.
Can I make Cookie Monster Cookies without eggs?
Yes! Substitute each egg with 1/4 cup unsweetened applesauce or use a commercial egg replacer. The texture will be slightly softer but still delicious.
What’s the best way to store Cookie Monster Cookies?
Keep cookies in an airtight container at room temperature for up to 4 days. For longer storage, freeze in a single layer, then transfer to a freezer-safe bag.
Can I use different mix-ins for this recipe?
Absolutely! Try M&Ms, peanut butter chips, chopped nuts, or even rainbow sprinkles. Customize based on your favorite flavors or what you have on hand.
How do I prevent my cookies from spreading too much?
Chill the dough for 30 minutes before baking, and use parchment paper or silicone baking mats. Space cookies at least 2 inches apart on the baking sheet.
Pin This Recipe!


Cookie Monster Cookies
- Total Time: 25-27 minutes
- Yield: 24 cookies 1x
Description
Bright blue, chunky, and loaded with mix-ins, these Cookie Monster Cookies are a playful treat perfect for kids and nostalgic adults alike. Easy to make and customizable, they’re a hit at parties, bake sales, or any fun occasion.
Ingredients
- 1 cup (226g) unsalted butter, softened
- 1 cup (200g) granulated sugar
- 1 cup (220g) light brown sugar, packed
- 2 large eggs, room temperature
- 2 teaspoons vanilla extract
- Blue gel food coloring (about 1/2 teaspoon, Wilton or Americolor)
- 3 cups (375g) all-purpose flour
- 1 teaspoon baking soda
- 1/2 teaspoon salt
- 1 cup (170g) semisweet chocolate chips or chunks
- 3/4 cup (75g) mini chocolate chip cookies (Chips Ahoy minis or similar)
- 3/4 cup (80g) crushed Oreo cookies (classic or Golden Oreos)
- 1/2 cup (80g) white chocolate chips (optional)
- Candy eyes (optional, for decoration)
Instructions
- Preheat oven to 350°F (175°C). Line baking sheets with parchment paper or silicone mats.
- In a large mixing bowl, beat butter, granulated sugar, and brown sugar until fluffy and pale, about 2-3 minutes.
- Beat in eggs and vanilla extract until well combined. Scrape down the sides of the bowl.
- Add blue gel food coloring a little at a time until you reach a vibrant blue shade. Mix thoroughly.
- In a separate bowl, whisk together flour, baking soda, and salt.
- Gradually add dry ingredients to the blue dough, mixing on low speed until thick and slightly sticky. If too dry, add 1 tablespoon milk; if too wet, add 1 tablespoon flour.
- Fold in chocolate chips, mini chocolate chip cookies, crushed Oreos, and white chocolate chips (if using). Reserve some mix-ins for topping.
- Use a medium cookie scoop (about 2 tablespoons) to portion dough onto prepared sheets, spacing about 2 inches apart. Press extra mix-ins and candy eyes on top.
- Bake for 10-12 minutes, until edges are set but centers look slightly underdone.
- Let cookies rest on the sheet for 3-5 minutes, then transfer to a cooling rack to cool completely.
Notes
For thicker cookies, chill the dough for 30 minutes before baking. Use gel food coloring for vibrant color without thinning the dough. Mix and match your favorite mix-ins like M&Ms, pretzels, or peanut butter chips. If cookies spread too much, chill dough longer. Cookies are best served slightly warm and can be stored in an airtight container for up to 4 days or frozen for up to 2 months.
- Prep Time: 15 minutes
- Cook Time: 10-12 minutes
- Category: Dessert
- Cuisine: American
Nutrition
- Serving Size: 1 cookie
- Calories: 220
- Sugar: 18
- Fat: 10
- Saturated Fat: 6
- Carbohydrates: 30
- Protein: 2
Keywords: cookie monster cookies, blue cookies, kids treats, party cookies, chocolate chip cookies, oreo cookies, fun cookies, bake sale, birthday dessert