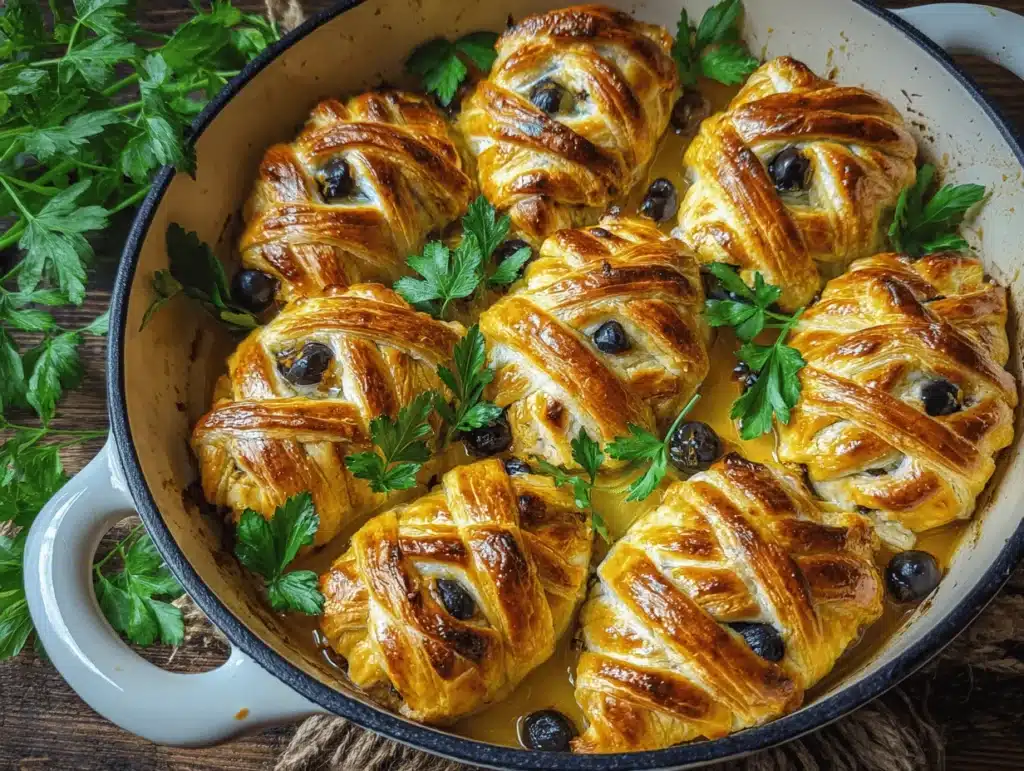
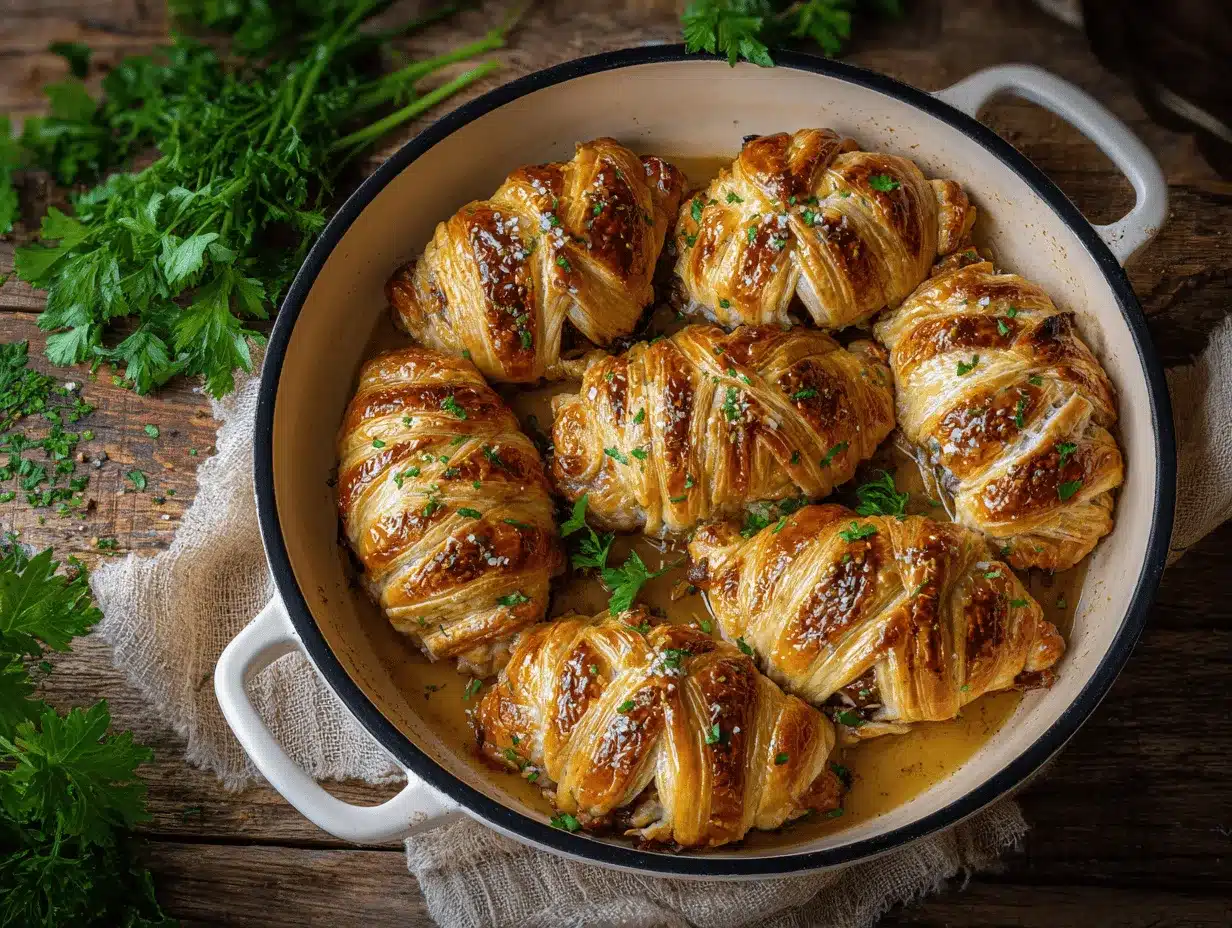
Biting into a warm, cheesy mummy wrapped chicken breast on Halloween night is something my family now looks forward to every year. The first time I tried making this, I was honestly scrambling for a last-minute festive dinner idea that wasn’t just another pizza or pasta. Let’s face it—Halloween is all about the fun, and sometimes, you want a meal that’s both delicious and Instagram-worthy (or, you know, Pinterest-perfect!). This Halloween mummy wrapped chicken breast recipe is exactly that: playful, tasty, and surprisingly easy to whip up.
I remember my youngest giggling at the googly olive eyes staring up from his plate—he declared them “too cute to eat,” then promptly devoured two servings. If you’ve never made a savory Halloween recipe before, you’re going to love how this turns out. I’ve tested different wrapping techniques, fillings, and even swapped out puff pastry for crescent dough (both work, but crescent dough is a tad flakier and more forgiving). This mummy wrapped chicken breast recipe is now our go-to for neighborhood parties and cozy October nights.
Not only does it deliver on flavor—think juicy chicken, creamy cheese, and crispy golden pastry—but it’s also packed with protein and crowd appeal. Whether you’re cooking for little monsters, picky teens, or just want something festive for grown-ups, this recipe has you covered. It’s simple enough for busy weeknights but impressive enough to steal the show at your next Halloween bash. If you’ve got hungry ghosts haunting your kitchen, trust me, these mummies will vanish fast!
Why You’ll Love This Recipe
- Quick & Easy: Ready in about 40 minutes, so you can spend less time in the kitchen and more time enjoying Halloween festivities.
- Simple Ingredients: Most items are probably already in your fridge or pantry—no fancy shopping required.
- Perfect for Parties: These mummy wrapped chicken breasts are a hit at Halloween gatherings, potlucks, and family dinners.
- Crowd-Pleaser: Kids love the spooky look, and adults can’t resist the savory flavor and flaky crust.
- Unbelievably Delicious: The combination of juicy chicken, melted cheese, and golden pastry is pure comfort food.
What sets this mummy wrapped chicken breast recipe apart is the attention to detail. I always tuck a bit of mozzarella or cream cheese inside the chicken for added richness (it melts beautifully). The wrapping isn’t just for looks—it locks in moisture, so the chicken stays tender. I’ve played with different herbs and seasonings, and honestly, a sprinkle of garlic powder makes all the difference.
You know that feeling when you serve something and everyone’s eyes light up? That’s this recipe. It’s not just festive—it’s genuinely satisfying. Plus, you don’t need to be a baking whiz or have hours to spare. The steps are forgiving, and even if your mummies look a little “wonky,” they’ll taste fantastic. It’s the kind of meal that brings laughter to the table and memories you’ll cherish. Whether you’re impressing guests or making dinner extra special for your family, this is my best version of a Halloween classic.
What Ingredients You Will Need
This recipe uses simple, wholesome ingredients to deliver bold flavor and that signature Halloween charm. Most are pantry staples with a few fun extras for the festive look. Here’s what you’ll need for your amazing Halloween mummy wrapped chicken breast:
- For the Chicken:
- 4 boneless, skinless chicken breasts (about 1 lb / 450 g)
- 1 teaspoon salt
- 1/2 teaspoon black pepper
- 1/2 teaspoon garlic powder
- For the Filling:
- 4 ounces (115 g) cream cheese, softened (or use herbed cheese spread)
- 1/2 cup (56 g) shredded mozzarella cheese (adds gooeyness)
- 1/4 cup (25 g) finely chopped fresh parsley or chives (optional, for color)
- For the Mummy Wrap:
- 1 sheet (8 oz / 225 g) puff pastry or refrigerated crescent dough (thawed)
- 1 large egg, beaten (for egg wash)
- For the Eyes:
- 8 sliced black olives (for mummy “eyes”)
- Extra cheese or small bits of red pepper (optional, for “pupils”)
Ingredient Tips: For best results, choose chicken breasts similar in size so they cook evenly. I prefer Philadelphia cream cheese for the filling—it’s smooth and easy to spread. If you’re gluten-free, swap puff pastry for a gluten-free crescent dough (Trader Joe’s has a good one). For dairy-free, use plant-based cheese and vegan pastry. You can also toss in chopped spinach or cooked bacon for extra flavor.
Substitution Notes: No mozzarella? Try Monterey Jack or Swiss for a twist. Out of olives? Use capers, sliced pickles, or candy eyes for a playful look. If you’re making a big batch, double the filling and pastry.
Seasonal Touch: In autumn, toss in roasted butternut squash or caramelized onions to the filling. For a spicy kick, add a pinch of chili flakes to the cheese mix. The ingredients are flexible, so make it your own!
Equipment Needed
- Baking Sheet: Standard size works great, but I’ve used a pizza pan in a pinch.
- Parchment Paper: Keeps cleanup easy and prevents sticking.
- Sharp Knife: For trimming pastry and prepping chicken—serrated knives work well for slicing dough strips.
- Small Bowl: For mixing the cheese filling.
- Pastry Brush: For egg wash; if you don’t have one, use a clean finger or spoon.
- Toothpicks: Optional, to help secure mummy wraps (just remember to remove before serving!).
- Measuring Cups & Spoons: For accuracy—makes a difference in taste and consistency.
If you don’t own a pastry brush, a silicone spatula is a surprisingly good alternative. Budget-wise, parchment paper is worth every penny (I learned the hard way with stuck-on pastry). For cleaning, soak your baking sheet right after—cheese can get crusty fast! Honestly, I’ve used a pizza cutter for dough strips, and it works like a charm. You don’t need fancy gear—just a little creativity.
Preparation Method
-
Prep the Chicken:
Preheat your oven to 400°F (200°C). Pat the chicken breasts dry with paper towels—this helps seasonings stick and gives a better crust. Sprinkle both sides of each breast with salt, pepper, and garlic powder. Set aside. -
Make the Filling:
In a small bowl, mix together the softened cream cheese, shredded mozzarella, and chopped parsley. The mixture should be spreadable but not runny. If it’s too thick, add a teaspoon of milk. Taste and adjust salt if needed. -
Fill the Chicken:
Using a sharp knife, make a horizontal slit in the thickest part of each breast to create a pocket (don’t cut all the way through!). Stuff about 2 tablespoons of the cheese mixture into each pocket. Press the edges to seal—if the filling oozes out a little, that’s fine. -
Prepare the Mummy Wrap:
Roll out the puff pastry or crescent dough on a lightly floured surface. Cut into thin strips, about 1/2 inch (1.25 cm) wide. You’ll need about 6-8 strips per chicken breast. -
Wrap the Chicken:
Lay a chicken breast on the baking sheet lined with parchment. Gently wrap the dough strips around the breast in a crisscross pattern, leaving small gaps so it looks “mummified.” Tuck the ends underneath or secure with toothpicks if needed. Leave space at one end for the eyes. -
Add the Eyes:
Place two olive slices on the exposed area of each chicken breast. You can add a small piece of cheese or red pepper in the center for “pupils.” Press gently so they stick. -
Brush with Egg Wash:
Using your pastry brush, lightly coat the pastry with beaten egg. This gives a golden color and helps the strips stay together. -
Bake:
Transfer the baking sheet to the preheated oven. Bake for 22-25 minutes, or until the pastry is puffed and golden and the chicken is cooked through (internal temperature should reach 165°F / 74°C). If the pastry browns too quickly, tent loosely with foil. -
Check Doneness:
Pierce the thickest part of the chicken with a thermometer or knife. Juices should run clear, and the cheese inside should be melted. -
Cool & Serve:
Let the mummy wrapped chicken breasts rest for 5 minutes before serving. Remove toothpicks if used and arrange on a platter for maximum Halloween effect.
Troubleshooting: If dough splits while wrapping, pinch it together or patch with extra strip. If chicken is too thick, flatten slightly with a meat mallet. Trust your senses—if it smells toasty and looks golden, that’s the sweet spot.
Efficiency Tip: Prep filling and dough strips ahead. If you’re short on time, assemble mummies the night before and bake fresh.
Cooking Tips & Techniques
Wrapping the chicken can feel a little fiddly at first, but don’t sweat perfection—slightly uneven “bandages” actually look more authentic! Here’s what I’ve learned from a few Halloween kitchen mishaps:
- Keep Dough Cold: Warm pastry gets sticky and hard to work with. If it’s softening, pop it in the fridge for 5 minutes.
- Don’t Overstuff: Too much filling will ooze out during baking. Two tablespoons is plenty—trust me, I’ve tried more and it gets messy!
- Use Egg Wash Generously: It helps the pastry brown evenly and “glue” the strips together.
- Spacing is Key: Leave small gaps when wrapping so steam can escape and pastry crisps up.
- Test Internal Temp: A digital thermometer is your friend—165°F (74°C) is perfect. Underbaked chicken is a party foul.
- Multitasking: While the chicken bakes, clean up, set up your Halloween table, or prep a simple veggie side.
- Don’t Skip Resting: Letting the mummies sit for a few minutes keeps juices inside and helps pastry stay flaky.
My first attempt, I wrapped the chicken too tightly and the pastry split. Lesson learned: gentle hands and a little overlap go a long way. If you want extra crunch, sprinkle sesame seeds or poppy seeds on the egg-washed pastry before baking. And if you’re making a big batch, rotate the baking sheet halfway through for even browning. It’s all about balancing fun and flavor—don’t stress over a little imperfection!
Variations & Adaptations
- Gluten-Free Variation: Use a gluten-free crescent dough or pastry. The flavor stays great, and there’s no compromise on texture.
- Spicy Kick: Add diced jalapeños or pepper jack cheese to the filling. If you like heat, a dash of chipotle powder is awesome!
- Veggie Swap: Use roasted eggplant or zucchini slices in place of chicken for a vegetarian option. They’re surprisingly hearty and soak up the cheesy filling.
- Seasonal Twist: In fall, add a tablespoon of pumpkin puree to the cheese filling for a subtle sweetness. Top with roasted pumpkin seeds for crunch.
- Dairy-Free Adaptation: Substitute vegan cream cheese and dairy-free mozzarella. Vegan puff pastry is widely available and works well.
I once made a version with turkey breast—worked perfectly and tasted just as festive. If you’re serving a crowd, you can make “mini mummies” using chicken tenders. For allergen concerns, swap out cheese for a soy-based alternative, and use sliced cucumber for eyes instead of olives. The possibilities are endless, and you can tailor this recipe to suit almost any dietary need.
Personal favorite? I sometimes tuck a slice of prosciutto in with the cheese—it’s salty, savory, and makes the mummies extra flavorful. Trust your tastes—this recipe loves a little customization!
Serving & Storage Suggestions
Serve these Halloween mummy wrapped chicken breasts hot, straight from the oven. I like to arrange them on a big platter surrounded by roasted veggies or a spooky salad (think purple cabbage and orange carrots!). For presentation, drizzle with a little sriracha “blood” or serve with ranch dip for extra fun.
Pair with mashed potatoes, sweet potato fries, or a simple green salad. Sparkling cider or homemade lemonade makes a great beverage for kids, while adults might enjoy a crisp white wine.
Storage: Leftovers keep well in the refrigerator for up to 3 days. Wrap tightly in foil or store in an airtight container. To freeze, let cool completely, then wrap each mummy in plastic wrap and foil—freeze up to 1 month.
Reheating: Reheat in a 350°F (175°C) oven for 10-12 minutes, or until heated through. Microwave works in a pinch, but pastry won’t be as crisp. Honestly, the flavors deepen overnight, and these make a pretty awesome lunch the next day.
For parties, you can bake ahead and warm just before serving. Add fresh olive eyes for best visual effect. These mummies are surprisingly sturdy, so they travel well for potlucks too!
Nutritional Information & Benefits
Each Halloween mummy wrapped chicken breast provides approximately:
- Calories: 380
- Protein: 28g
- Fat: 22g
- Carbohydrates: 18g
- Fiber: 1g
Chicken breast is a lean source of protein, perfect for keeping energy up during busy Halloween nights. The cheese adds calcium and flavor, while pastry brings comfort (and a little indulgence). For gluten-free or dairy-free diets, use the suggested swaps above—nutritional counts will vary a bit, but the recipe remains balanced.
Potential allergens include wheat (pastry), dairy (cheese), and eggs. Always check ingredient labels if you’re cooking for sensitive eaters. Personally, I love that this recipe combines wholesome protein with just enough “treat” factor to keep everyone happy. It fits well into most family routines—even with a busy schedule, you get a festive, nutrient-rich dinner without fuss.
Conclusion
If you’re searching for a Halloween dinner idea that’s both festive and easy, this mummy wrapped chicken breast recipe is the answer. It’s packed with flavor, simple to make, and guaranteed to bring smiles (and maybe a few giggles) to your table. Whether you’re customizing for dietary needs, serving at a party, or just adding some fun to a weeknight meal, this recipe is endlessly adaptable.
I love making these every October because they turn dinner into a celebration. The look is playful, the taste is comforting, and cleanup is a breeze. Don’t be afraid to tweak the filling or get creative with your mummy “bandages”—your kitchen, your rules!
Ready to make your own Halloween mummy wrapped chicken breasts? Try it out and let me know how your mummies turn out in the comments below. Share your photos or favorite twist—let’s inspire each other! Wishing you a magical, delicious Halloween (and remember, the best recipes are the ones you make your own).
FAQs
Can I use chicken thighs instead of chicken breasts?
Yes, boneless chicken thighs work well—just flatten them slightly and adjust baking time as they cook a bit faster.
What’s the best pastry for wrapping?
Puff pastry gives a light, flaky result, but crescent dough is softer and easier to handle. Both work, so choose your favorite!
How do I make this recipe gluten-free?
Use a gluten-free crescent dough or pastry—most supermarkets carry a good selection. Filling stays the same and tastes great.
Can I prepare these mummy wrapped chicken breasts ahead of time?
Absolutely! Assemble up to a day ahead, store covered in the fridge, and bake fresh before serving. Add olive eyes just before baking for best results.
What can I use instead of olives for the eyes?
Try sliced pickles, capers, or even small pieces of bell pepper. Candy eyes work for a sweet twist but aren’t recommended for savory dishes.
Pin This Recipe!

Halloween Mummy Wrapped Chicken Breast
- Total Time: 40 minutes
- Yield: 4 servings 1x
Description
Juicy chicken breasts stuffed with creamy cheese, wrapped in flaky pastry, and decorated with olive ‘eyes’ for a festive, kid-friendly Halloween dinner. This easy recipe is playful, delicious, and perfect for parties or cozy October nights.
Ingredients
- 4 boneless, skinless chicken breasts (about 1 lb)
- 1 teaspoon salt
- 1/2 teaspoon black pepper
- 1/2 teaspoon garlic powder
- 4 ounces cream cheese, softened (or herbed cheese spread)
- 1/2 cup shredded mozzarella cheese
- 1/4 cup finely chopped fresh parsley or chives (optional)
- 1 sheet (8 oz) puff pastry or refrigerated crescent dough, thawed
- 1 large egg, beaten
- 8 sliced black olives (for eyes)
- Extra cheese or small bits of red pepper (optional, for pupils)
Instructions
- Preheat oven to 400°F (200°C). Pat chicken breasts dry and season both sides with salt, pepper, and garlic powder.
- In a small bowl, mix cream cheese, mozzarella, and parsley/chives until spreadable. Adjust salt if needed.
- Cut a horizontal slit in each chicken breast to create a pocket. Stuff about 2 tablespoons of cheese mixture into each pocket and press edges to seal.
- Roll out puff pastry or crescent dough on a lightly floured surface. Cut into thin strips, about 1/2 inch wide.
- Wrap each chicken breast with dough strips in a crisscross pattern, leaving gaps for a mummy look. Tuck ends underneath or secure with toothpicks. Leave space at one end for eyes.
- Place two olive slices on the exposed area of each chicken breast for eyes. Add cheese or red pepper bits for pupils if desired.
- Brush pastry with beaten egg using a pastry brush.
- Bake on a parchment-lined baking sheet for 22-25 minutes, until pastry is golden and chicken is cooked through (internal temp 165°F). Tent with foil if pastry browns too quickly.
- Check doneness by piercing the thickest part of chicken; juices should run clear and cheese should be melted.
- Let rest for 5 minutes before serving. Remove toothpicks if used and arrange on a platter.
Notes
For gluten-free, use gluten-free crescent dough. For dairy-free, use plant-based cheese and vegan pastry. Don’t overstuff chicken to avoid filling leakage. Keep dough cold for easier wrapping. Can be assembled ahead and baked fresh. Leftovers store well and reheat best in the oven.
- Prep Time: 15 minutes
- Cook Time: 25 minutes
- Category: Main Course
- Cuisine: American
Nutrition
- Serving Size: 1 mummy chicken breast
- Calories: 380
- Sugar: 2
- Sodium: 650
- Fat: 22
- Saturated Fat: 10
- Carbohydrates: 18
- Fiber: 1
- Protein: 28
Keywords: Halloween, chicken breast, mummy, festive dinner, kid-friendly, party food, easy recipe, puff pastry, crescent dough, cheese stuffed chicken